Conduent, LLC
Workflow
Training
Document
![]()
Last
updated:
Author: Sandie Van Staveren
![]()
FINAL COPY Conduent, LLC Workflow
Training Document
Table of
Contents
Tree View and Invoice List Page 5
Functionality Screen Page 6
Email Page 7
Document Search
Page 8-9
Invoice
History Page
10
Personal
Folders Page
11-12
Upload Documents/View Docs Page 12-13
Vendor Information/Notes Section Page 14
Invoice Header Information Page 15
General Ledger Coding Page 16
GL Pop Up Boxes Page 17
Add Notes/Suspend Page 28
Suspend Page 19
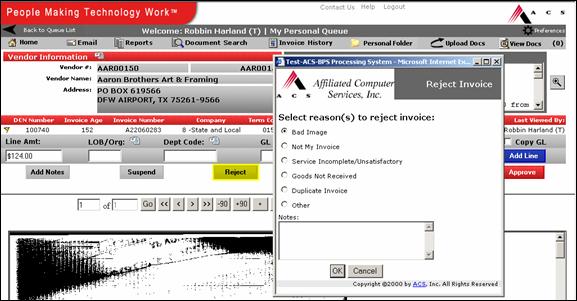
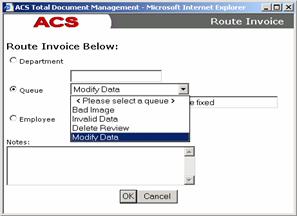
Reject Page 20-21
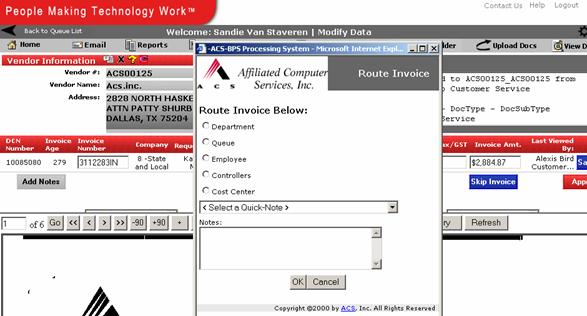
Route Page 22
Skip Invoice Page 23
Add Line Page 24
Approve Page 25
Image Page 26
Contact Us Page 27
TDM log in

Log In
All users will be given a
username and password to log into Workflow.
Key in the username and password and click the login button.
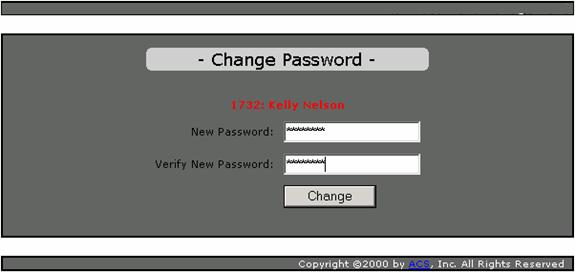
Change Password
Users may change their
password at any time. To do this, type
in the username and password and click the change password button.
* Username and passwords
are NOT case sensitive.
Change Password

Tree View and Invoice List
1 2
3 4 5 6 7
![]()
![]()
![]()
![]()
![]()
![]()
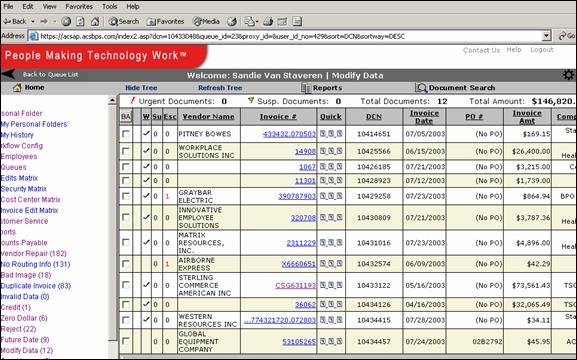
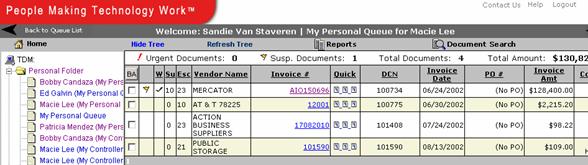
After
Users have logged into Workflow, a tree view and invoice list will be
displayed.
1 Tree View
The tree view is a list of
all the queues a user has access to view.
Every user will not be able to view all the queues. Workflow will default the user to their
“Personal Work Queue” when first logged in.
Users may click on any queue in the tree view menu to view the
queue-specific invoices. Clicking on an
invoice number will bring you to the coding screen.
2 BA (Bulk
Action)
Check the box for the
invoices you would like to action then click the BA button at the top. A box
will appear giving options for the actions that can be performed. All actions
requiring business unit or routing information will use the invoice on the top
that is checked for that information.
3 W (Worked)
6 Invoice List
An invoice list will be available for view inside the
individual queues. Users have the
ability to view the vendor name, invoice number, DCN, invoice date, PO number,
invoice amount and company for each invoice in that queue. Users also have the option to sort each
column either ascending or descending by clicking on the column name. Click once to list the information ascending
and, click the column name again for descending.
7 Invoice Link
![]()
![]()
![]() Quick
Quick
 Functionality Screen
8 9 10
11
2
13 14 15
8 
Clicking on the home icon
will bring the user back to the tree view.
This button must be used to go back.
Note: Do not use the IE Explorer back button while inside the AP Workflow System.
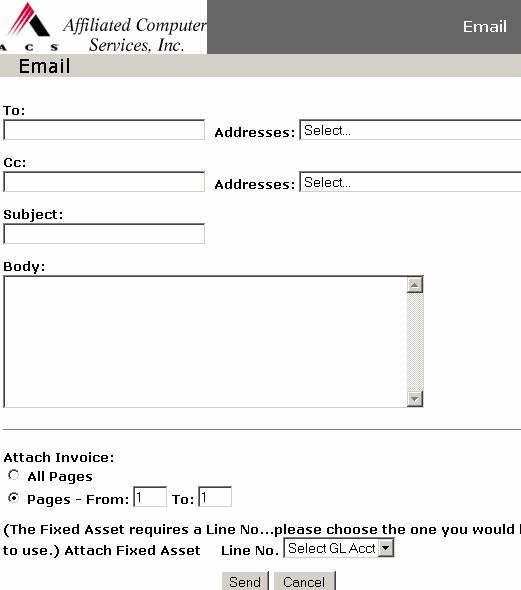
9 ![]()
The user has the ability to
send an invoice image and all keyed data as an email attachment. Make sure either All Pages or Pages From__
To__ is clicked.
10![]()
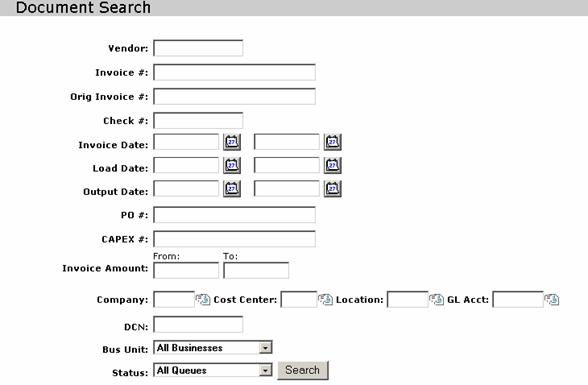
By using Document Search, invoices can be searched by
any or all of the following:
1.Vendor
2. Invoice Number
3. Original Invoice number
4. Check Number
5. Invoice Date
6. Load Date
7. Output Date
8.
9. CAPEX Number
10.Invoice Amount
11.LOB/Org
12.Location
13. DCN (Document Control Number)
14. Bus. Unit
15. Status
To search the Workflow System (SIR) for a specific
invoice or particular set of invoices use the following search fields. Single or multiple search fields may be used
when searching for an invoice. Type in
the information in the needed fields
Document Search
Cont…
and hit the search button.
Search Fields
Vendor Search
Invoice Number Search
To search Workflow for a particular invoice number or set of invoices with a specific number, type at least the first three invoice numbers. Workflow will bring up a list of all invoices starting with that specific number.
Check Number Search
Invoice Date Search
PO or CAPEX Number Search
Invoice Amount Search
To search Workflow for a particular invoice amount,
type a From and To Invoice
Amount.
LOB/ Org
To search Workflow for a particular Company, type
either the exact Company or a minimum of the first three digits of the Company.
Department Code
To search Workflow for a particular GL Account, type
either the exact GL Account or a minimum of the first three digits of the GL
Account.
Location
To search Workflow for a particular location, type either the exact location or a minimum of the first three digits of the location.
DCN
To search Workflow for a particular Document Control
Number, you must type the exact DCN.
Business Unit
To search workflow for a specific business group,
select the group from the drop down.
Status
To search workflow for the status of an invoice, select
from the drop down
Invoice History
11 ![]()
![]()

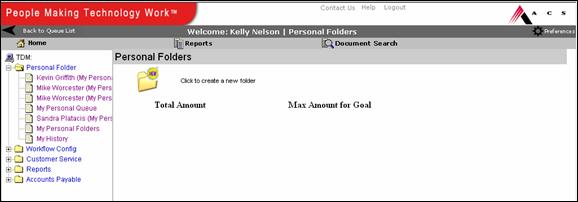
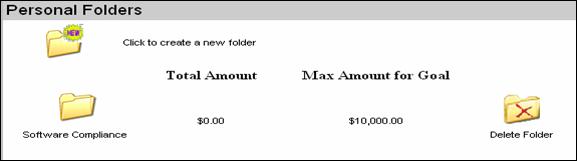
Personal Folders
12
![]()
An end user may use My Personal Folders to help them
track invoices. Submitting an invoice to
your personal folder will only keep a copy of the invoice for your personal
use. Click on the folder icon to create
a personal folder.
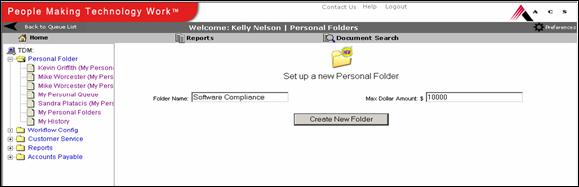
![]()
Add the folder name and maximum dollar amount you
want to track for that folder and click on create new folder.
![]()
Add the Document Control Number, Invoice information,
Invoice Amount and any comments in the correct fields. You must then click the Add Invoice to Folder
button, which will then save a copy of the invoice in your personal folder.
![]()
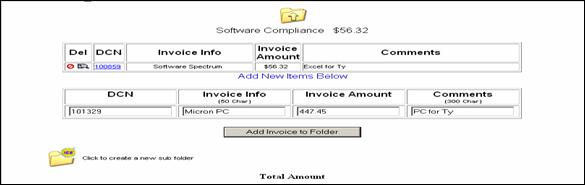
You may view the invoice image by clicking on the DCN
link.
Upload
Docs
13![]()
![]()
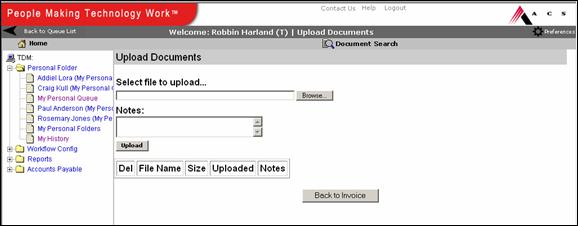
![]()
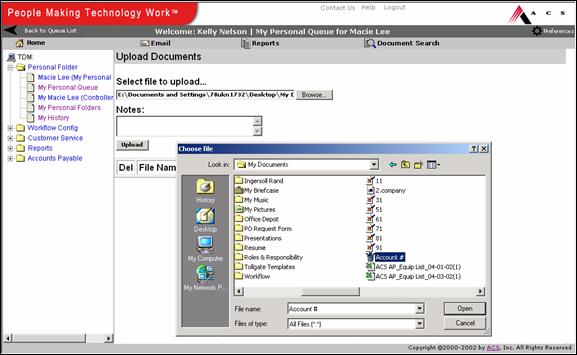
14 ![]()
![]()
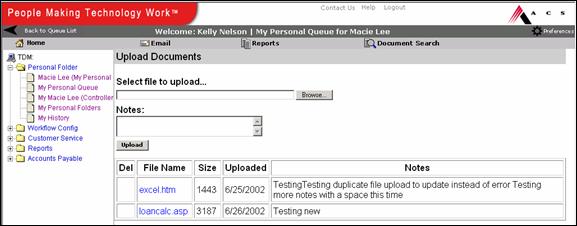
To view the uploaded document click on the document
link.
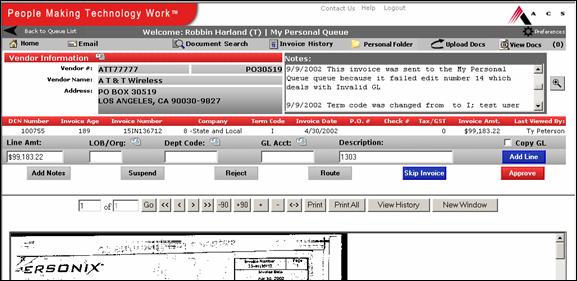
Vendor Information
![]()
![]() 1.
2.
1.
2.
![]()

The vendor information is indexed and should match up
with the vendor address on the invoice.
If the information is not correct please route it to the Modify Data
queue.
![]() To verify if a vendor is in the system, click on the
yellow question mark and put in the vendor name. If the vendor information
doesn’t show up, then a W-9 and vendor maintenance form needs to be submitted
to your local accounting department.
To verify if a vendor is in the system, click on the
yellow question mark and put in the vendor name. If the vendor information
doesn’t show up, then a W-9 and vendor maintenance form needs to be submitted
to your local accounting department.
![]() This box is used to verify original fields. For
instance, by clicking on this icon this would give you the full invoice number
if it was truncated.
This box is used to verify original fields. For
instance, by clicking on this icon this would give you the full invoice number
if it was truncated.
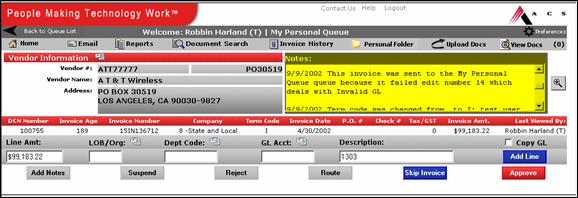
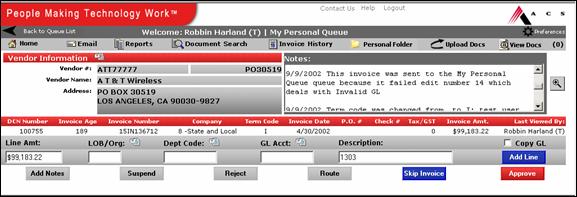
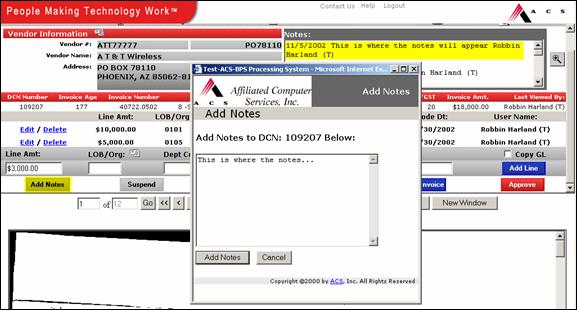
Notes
Section
Invoice Header Information
![]()
![]()
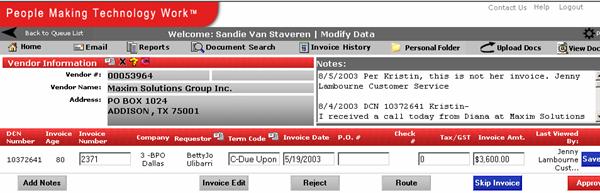
The
Invoice Header gives summary information for the individual invoice.
![]()
- DCN Number- a unique Document Control Number
will be assigned to each invoice document set.
- Invoice Age- identifies how many days the
invoice has been in workflow.
- Invoice Number- indicates the invoice number
that was indexed from the invoice.
- Company- identifies which Conduent, LLC the invoice
was scanned under.
- Requestor- identifies the requestor’s name
located on the invoice.
- Terms Code- identifies the terms of when the
invoice is due for payment.
- Invoice Date- indicates the invoice date that
was indexed from the invoice.
- PO Number- indicates the purchase order number
that was indexed from the invoice.
- Check Number- If the invoice has been paid previously, this field indicates the check number the
invoice was paid from.
- Tax/ GST- indicates the
Tax/ GST amount that was indexed from the invoice.
- Invoice Amount- indicates the total invoice
amount indexed.
- Last Viewed by- identifies the user who last
viewed the image.
General Ledger Coding
![]()
![]()
![]()
![]()
![]()
1 2 3 4 5
The Workflow System provides end
users the ability to code and approve invoices. GL coding will happen in the GL
coding line.
GL Coding Fields
1 Line Amount
Workflow will automatically
populate the line amount from the invoice amount. If the line amount is
different from the invoice amount, the user should code the correct line
amount.
2 LOB/ Org
Pop Up Boxes For Coding


![]()
If the LOB/ Org, Dept Code
or GL Acct is not known the user may use the pop up boxes next to each field to
choose the correct information. Click on
the correct code to have the system populate the field with the user selection.
LOB/ Org pop up box


Add Notes

![]()
Users may add notes about
an invoice by clicking on the Add Notes button. A pop up box will appear where the notes
should be typed. Once the notes are
typed, click the Add Notes button in the pop up box and the notes will
appear in the Notes section. All notes
will also be documented in Invoice History.
Suspend
![]()
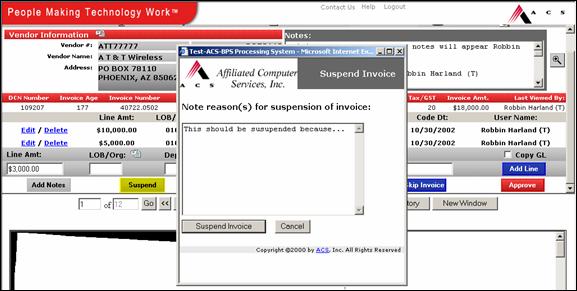
![]()
Users have the
functionality to Suspend an invoice. A reason must be typed in the pop up box for
an invoice to be suspended. The
suspended invoice will then stay in the queue for 10 days and a suspend flag
will be added next to the invoice information.
![]()
![]()
![]()
![]()

![]()
![]()
![]()
![]()
![]()
![]()
![]()
![]()
![]()
End users have the opportunity to approve the invoice once the information has correctly been coded. Once all the GL lines have been coded correctly for the invoice, click on the Approve button to authorize the invoice. If the user does not have the appropriate dollar limit to approve the invoice, a pop up box will come up prompting the user to route the invoice to their over limit authorizer.
Image


·
Users have the
functionality to view any page of the document.
For example the user can view page 15 of 45 by typing in 15 and clicking
on the ![]() button.
button.
·
The ![]() button is used to view the first page of the
document.
button is used to view the first page of the
document.
·
The ![]() button will bring up the previous page of the
document.
button will bring up the previous page of the
document.
·
The ![]() button will bring up the next page of the
document.
button will bring up the next page of the
document.
·
The ![]() button will bring up the last page of the
document.
button will bring up the last page of the
document.
·
The ![]() will rotate the image 90 degrees to the left.
will rotate the image 90 degrees to the left.
·
The ![]() will rotate the image 90 degrees to the right.
will rotate the image 90 degrees to the right.
·
The ![]() button will zoom in the image.
button will zoom in the image.
·
The ![]() button will zoom out the image.
button will zoom out the image.
·
The ![]() button will convert the image from black on
white to white on black.
button will convert the image from black on
white to white on black.
·
The ![]() button will print out the invoice currently on
the screen.
button will print out the invoice currently on
the screen.
·
The ![]() button will print out the entire invoice.
button will print out the entire invoice.
·
The ![]() button will bring up a new window for the
invoice
button will bring up a new window for the
invoice
·
The ![]() button will bring up
invoice history.
button will bring up
invoice history.
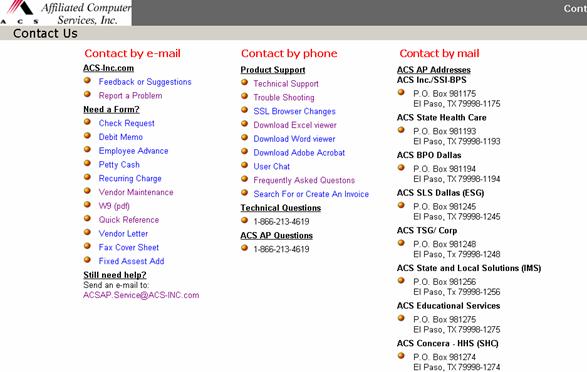
Contact Us
![]()

Under the Contact
Us link, a user may contact the Conduent, LLC AP Workflow team by email, phone or get an
address to send invoices. There are also
forms to download, fax coversheets for urgent invoices, W9 forms, etc…
![]()
![]()